Become a Solo Validator
To become a solo validator, you’ll need to:
- Run a Conflux node.
- Register it in PoS.
- Stake CFX in this PoS node.
This guide will walk you through the process of setting up a solo validator.
1. Run a Conflux node
A PoS node is also a Conflux node. So you can run a PoS node following the run a node guide. Either a full node or a archive node is fine.
The PoS configuration file for the node is located in the pos_config directory within the downloaded node package. The pos_config.yaml file in this directory is the PoS configuration file, and typically, the settings in this file do not need to be modified.
When you first start the node, you will be prompted to set a password to protect the PoS private key of the node. Please remember this password carefully, as it cannot be recovered if forgotten. When the node is restarted later, you will be required to enter this password. The private key is stored in the pos_config/pos_key file in the node directory, and it is recommended to create a backup of this file.
When starting the node for the first time, it is recommended to use a blockchain data snapshot, as it can significantly accelerate the node synchronization speed. Please refer to Blockchain Data Snapshot for information on how to use the blockchain data snapshot.
Once the node data is synchronized to the latest block (and the "Catch-up mode" in the node logs changes to false), you can proceed with PoS registration.
2. Register it in PoS
前提条件
To become a validator, you need to register your node in PoS. To register a node, you need a Conflux Core account and the node's PoS register data.
So first you should have Fluent Wallet installed, and have a account with at least 1000 CFX + gasFee in it. Because one PoS vote is 1000 CFX.
The you can get the PoS register data by running the following command in your node directory:
./conflux rpc local pos register --power 1
# it will return something like this:
[
  "0xe335b451eb0d497f27d8d73d12d6c5f13b12b5c0ebad872dc59536341cd1f31c4ede98d8000000000000000000000000000000000000000000000000000000000000000100000000000000000000000000000000000000000000000000000000000000a0000000000000000000000000000000000000000000000000000000000000010000000000000000000000000000000000000000000000000000000000000001600000000000000000000000000000000000000000000000000000000000000030808c124f4a9b389f0c53a279cff171083c878437369189f03416836dfe7e10873b28db2df8109e226707388ac6588a6a0000000000000000000000000000000000000000000000000000000000000000000000000000000000000000000000210256c97da1270db8aad8dd7ed6785953c691b77dd9c0830c327ff3b4e637e9bb4200000000000000000000000000000000000000000000000000000000000000000000000000000000000000000000000000000000000000000000000000004000000000000000000000000000000000000000000000000000000000000000a00000000000000000000000000000000000000000000000000000000000000030b748cd4ed52f203e09a8299a5e29444a05fd0e8499de0a81ed4c00bb23ddd910f8eec13f0c67b8833f8bd4fbb1217f2b000000000000000000000000000000000000000000000000000000000000000000000000000000000000000000000020455b9bb17f42f8f6cd14450acb13959a1ddf2302b2c5ecf25c82cee371c2cf1f",
  "eb0d497f27d8d73d12d6c5f13b12b5c0ebad872dc59536341cd1f31c4ede98d8"
]
It should return two strings, the first one is the register data, the second one is the PoS node address.
Stake in PoW
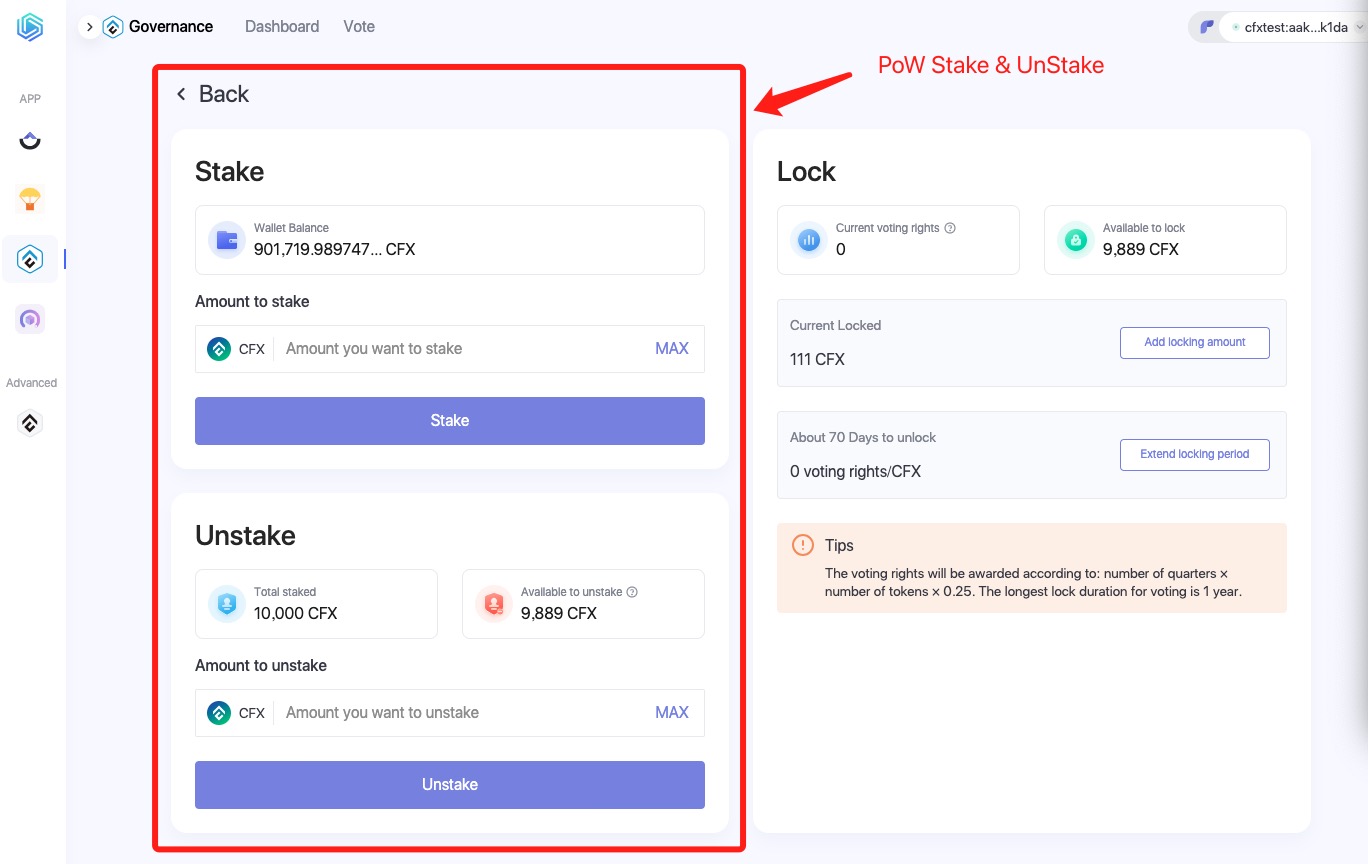
Before you can register your node in PoS, you need to stake some CFX in PoW, you can do it use ConfluxHub's PoW stake tool.

It is very easy to use, just connect your Fluent wallet, input the amount of CFX you want to stake, and click the "Stake" button. Here we can choose to stake 1000 CFX.
Register
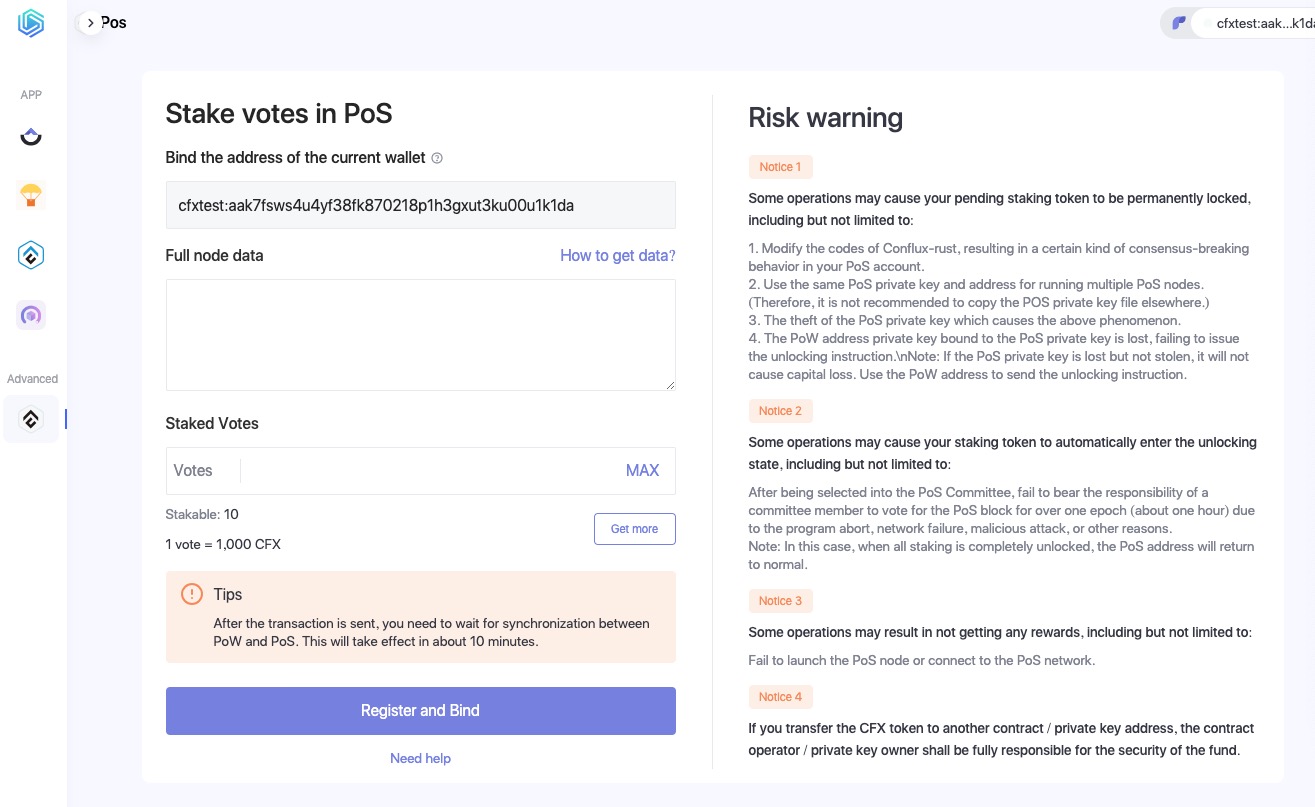
Then we can use the ConfluxHub's PoS register tool to register our node.
- Paste the register data we got in the previous step into the "Full node data" input box.
- Input 1 in the "Votes" input box.
- Click the "Register and Bind" button.
- It will pop up a window to confirm the transaction, click the "Confirm" button.

After the transaction is executed, the register data will be synced to the PoS chain, and the sync process will take about 10 minute.
3. Stake CFX in this PoS node
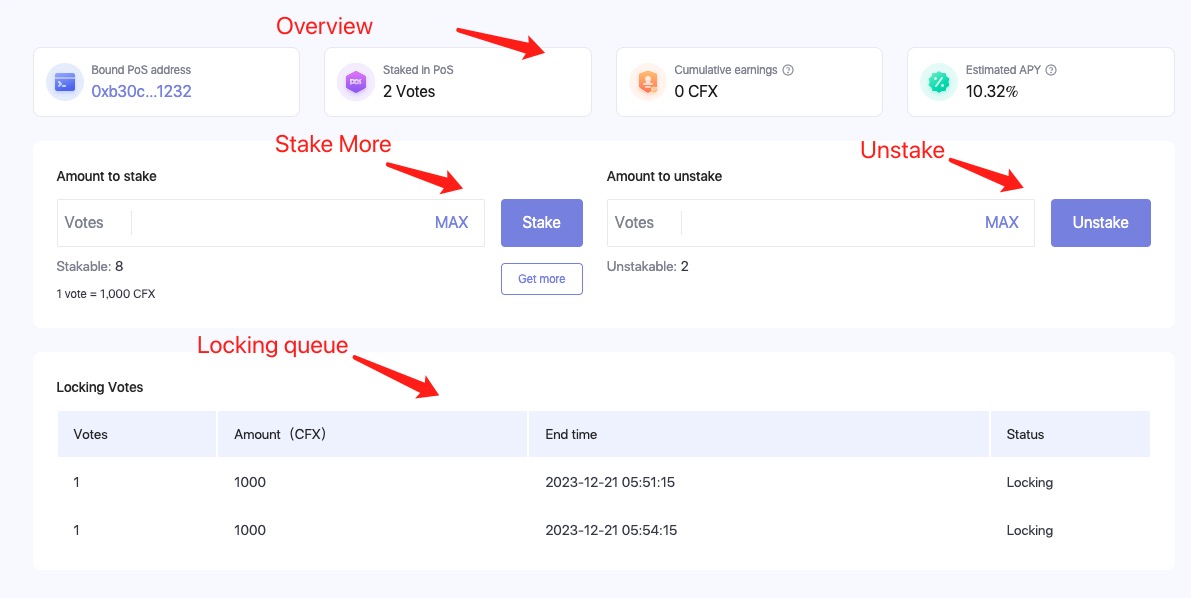
After the register data is synced to the PoS chain, you can enter a page like this.

This is PoS validator dashboard, you can:
- See validator's status: PoS address, How many votes it has, How much reward it has got, etc.
- Stake more Votes to this validator, unstake votes from it.
- See the validator's Locking & Unlocking votes.
Stake more Votes
You can stake more votes to this validator anytime you want, first you need stake more CFX in PoW, then input the amount of votes you want to stake in the "Votes" input box, and click the "Stake" button. Then these votes will be synced to PoS chain in about 10 minutes.
Normally the new staked votes will be in locking status for 13 days. After 13 days, these votes will be in locked status. The votes in Locking status will also have rewards.
Unstake votes
If you want to unstake some votes from this validator, you can input the amount of votes you want to unstake in the "Votes" input box, and click the "Unstake" button. Then these votes will be synced to PoS chain in about 10 minutes.
Normally the unstaked votes will be in unlocking status for 1-14 days. After that, these votes will be in unlocked status, and can be withdrawn to your account use the ConfluxHub's Pow Stake Tool
View validator's status in ConfluxScan
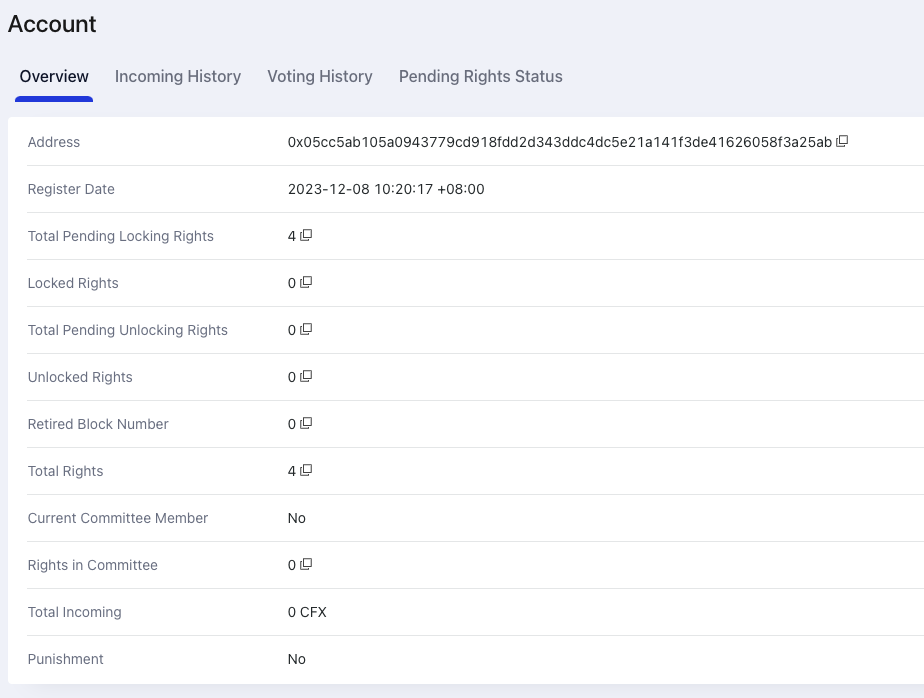
You can also view validator's status in ConfluxScan. By visiting this url https://confluxscan.io/pos/accounts/0x<your-pos-node-address>?tab=overview
In this page you can view:
- Validator's status in detail.
- Incoming history.
- Voting History.
- Pending Rights Status: The locking and unlocking votes.

Mainnet & Testnet ConfluxHub
常见问题解答
Which Conflux Space does the register process take?
It's in Core Space, and Fluent Wallet is required in this process.
How do I claim my rewards?
The rewards will be automatically sent to your Core Space account every half hour.
What's the expected reward rate?�
The expected reward rate is 10-14% per year.
Why my node is not elected?
The more votes you have, the more likely you will be elected. There are total 300 votes in the network, you can calculate the required votes to be elected by this formula:
Total CFX staked in the network / 300 = Required votes to be elected
The other reason is that your node is not running correctly, you can check your node's status:
- Is your node synced to the latest block?
- Are your node's
pos_keyandpos_db/secure_storage.jsonmatching? If you are unsure, you can delete thepos_db/secure_storage.jsonfile and restart your node; the node will regenerate thepos_db/secure_storage.jsonfile.
The risks to be aware of when running a node?
The risks to be aware of when running a node include:
- Risk of PoS private key leakage or loss. Please securely store the PoS private key and avoid uploading it to any public servers.
- Stability of PoS node operation. If the node is elected to the committee and does not participate in PoS voting for more than 1.5 hours, all PoS votes will be forcibly retired. There will be no rewards after retirement, but there won't be any penalties either.
- Sharing a pos_key file between two PoS nodes may result in the permanent lockup of all PoS votes for that node. This is the most severe risk and should be treated with utmost caution.
How to regenerate the PoS private key?
Deleting pos_config/pos_key and pos_db/secure_storage.json, and restarting the node will regenerate the PoS private key.Please be sure that you want to delete these two files because once deleted, your PoS account cannot be recovered.
How long does it take for CFX to go from staking to withdrawal in PoS?
14 days
How long does it take for unstaked PoS votes to be credited?
Typically, it takes 1-14 days, depending on the staking duration. If your PoS votes have been staked for over 13 days, unstaking will only take one day. If recently staked, it will require the full 14 days.
Can the PoS node bound to a PoW account be modified?
Modification is possible, but it requires unstaking all votes associated with the PoS node. Once the unstaking process is complete, the node can be directly bound to another PoS node.
Can a PoS node be bound to a PoW account that is a contract account? Does the contract need to implement the receive or fallback functions?
It can be a contract account, and there is no need to implement receive or fallback functions. This is because rewards are directly mined to the PoW account by the chain and do not involve transfers.